Microsoft OneDrive
Getting Started With OneDrive
OneDrive is a cloud storage system that is connected to your Microsoft 365 account and college email address. You can access this on any internet-enabled device in and outside of college for example at home.
With OneDrive, you can:
- Upload files from your device.
- Share files with others.
- Give others permission to edit files and work on them at the same time.
- Get to your files from anywhere, on your computer, tablet, or phone.
- Sync OneDrive to your PC or Mac, so you can access your files even when you’re offline.
Watch the video above to learn more about how you can get started with OneDrive.
Restore previous versions of files on your OneDrive
In OneDrive, you can restore and recover previous versions of files.
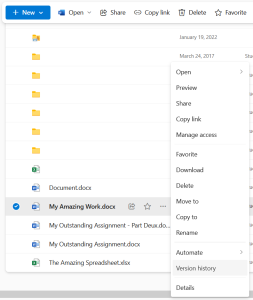
When you hover over or select a file, next to the file name select the Ellipsis three dot ‘Show more actions’ button for the folder or file of which you wish to restore a previous version.
Select the ‘Version History’ option in the menu.
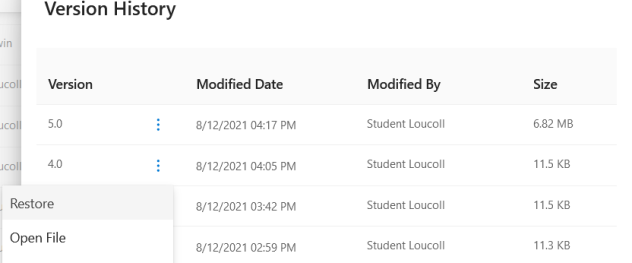
Examine the version history list for the selected file or folder. To restore or open one of them select the Ellipsis three dot ‘Show more actions’ button to view the options for the version you wish.
To restore this version of the folder or file, select ‘Restore’ from the menu.
Getting Started With OneDrive
What is OneDrive?
OneDrive is the Microsoft cloud service that connects you to all your files. It lets you store and protect your files, share them with others, and get to them from anywhere on all your devices.
How can I access OneDrive?
You can access OneDrive by logging into Microsoft 365. Simply go to the Microsoft 365 website and sign in using your Loughborough College email and password.
Is there a OneDrive app?
You can download OneDrive on a Windows device or on your smartphone or tablet from your usual App Store. Simply go to the OneDrive download page to download the app for your device.
Where can I find more information about restoring a file or folder on OneDrive?
You can find more information on how to do this here on the Microsoft Support website.


