Compress Images in PowerPoint
One of the most common issues students face when uploading PowerPoint files to Turnitin is the overall file size, often caused by a great number of uncompressed images. The size of uploaded images can quickly add up, making the presentation too large to submit.
By compressing the images before submitting, you can significantly reduce the file size, making the upload process quicker and more reliable, and help ensure a successful submission on the first try.
How to compress images in PowerPoint
To compress pictures in PowerPoint, follow the steps below.

Open the PowerPoint in the desktop version (compress pictures in not available in the online version).
Select a picture on one of the slides
![]() From the Picture Format tab on the toolbar, select Compress Pictures in the Adjust section. This may appear as an icon and text or just the icon.
From the Picture Format tab on the toolbar, select Compress Pictures in the Adjust section. This may appear as an icon and text or just the icon.
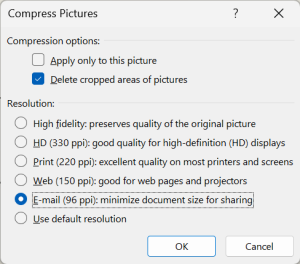 The Compress Pictures options pop-up window will open:
Under compression options, deselect Apply only to this picture.
Under Resolution, select Email (96 ppi).
Select the Ok button.
All of the images in the PowerPoint will now be compressed. Save the document, and it will be ready to upload to Turnitin.